
Never built a sleeper pneumag or a regular pneumag, but how difficult is it to stuff all the pneumag parts in the frame, without Luke's sleeper frontblock? So please discuss...

 Nobody's Perfect
Never built a sleeper pneumag or a regular pneumag, but how difficult is it to stuff all the pneumag parts in the frame, without Luke's sleeper frontblock? So please discuss...
 OldPBNoob

building a PneuMag in an Eframe should be easy. Not sure about sleeper. ITT there is more room than an intelliframe.
 RKM 3D Designs

If you need a frame I have one in my thread.Originally Posted by Nobody

 Rock'n out with my mag out
Would be neat too see if you could get the selector switch to work aswell
Registered User


http://i233.photobucket.com/albums/e...loguzzzzzz.jpg
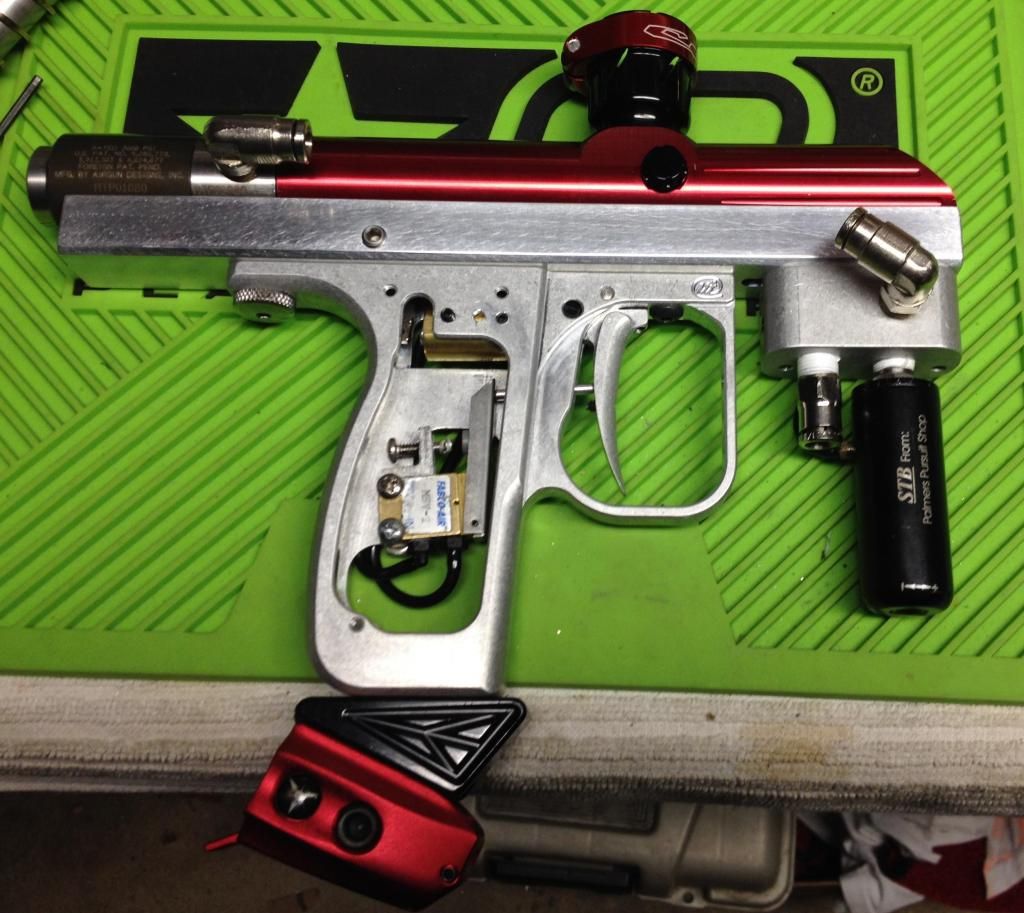
Thats John's fingerprint nightmare. Its a pnuemag, in a emag frame. but look closely there was alot done
RKM 3D Designs
YEAH, I got to see that one. in person. so mirror it has instant camo
 TEAM MIXXED BREED
Take it from someone who just built one , To build a "Sleeper" where the LPR an hose is hidden, with out Lukes block ,its gonna be damn near very tedious ,and aggravating tapping & running those 1/8 npt lines in and out.
NOT IMPOSSIBLE just alot harder without his manifold or one that's similar .
Build pic
https://www.automags.org/forums/showt...i-council-quot
This was the first pic of build ,so alot of adjustments have been made after this ,pistons been moved a bit ,and trigger rod length and adjustments
 One of 8 bosses... again.
Ugh... I really wanted to do this with my MM2K9, but my ideas lack the skills to accomplish them right now.
Here was My idea:
Run the LPR in the battery housing; mounting it to the battery pack bottom. It would require some milling out of the pack because it wasn't wide enough for a microrock, but you could use a thinner LPR. It would also require some plumbing work to connect fittings for the LPR. It would be easy to route the hose because you could run it inside the pack and up through the battery terminal holes. The Emag frame is already milled for wires, so routing the LPR hose through there shouldn't be an issue all the way to the frame. There could be some geometry issues inside the frame without milling out some of the mounts for the original EMAG stuff.
This would be really cool, in my opinion, because you could still set the trigger pull with the Emag adjustment and you already have a built in magnetic trigger return.
I had PM'd with luke about his emag bracket, and it is only useful with RT or Emag length rails. If you went with his housing, you would have to mill off the front of your Emag frame.
I had a couple of ideas about how to route the other hosing for the Xvalve as well (either use an ASA with L and R ports or try to work the plumbing inside the pack to have Macro fittings and hose run out of there). What I really wanted to try was to make it an EP mag with the LPR in the battery pack and the board and battery in the grip frame. I just don't have the time or the tools to do it.
So, yes... I think it's definitely possible.

Stay Classy, AO...BEO: RIP / Topgun Paintball: RIP / Old MCB: RIP
 lukescustoms.com

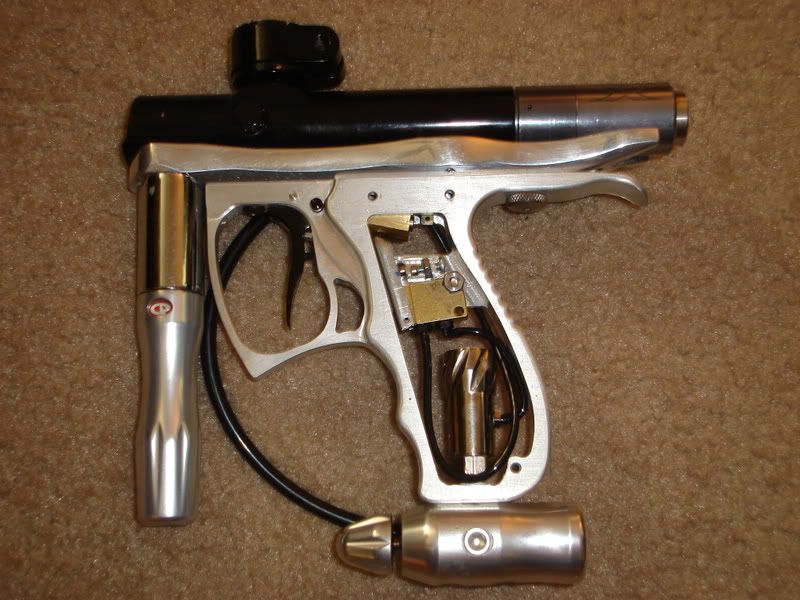
Nu, thats the first pneumag build I've seen using my frame, I was beginning to wonder if anyone had actually built one!
One of 8 bosses... again.
Hmm... maybe the microrock will fit...

lukescustoms.com
That’s not a completly accurate statement, the manifold block is designed to be used with a stock length Automag rail too, it just sticks out past the end of the rail. (I set the mounting screws back far enough to allow for that.)
Last edited by luke; 12-12-2014 at 03:09 PM.
Serious About Men

There would be no way to do this unless it was an EPnueMag
Il n'y a point de sots si incommodes que ceux qui ont de l'esprit.
TEAM MIXXED BREED
BTW i dont think mines a "Micro rock" ? They make um smaller than this . Mine made the battery sleeve ,super tight on it, and had to be sanded down.
I would not recommend the one on my set-up
Commenting on just build functionality, Your frame is amazing ,in how it roughts the hoses, out of the way of the piston
Last edited by NU_METAL; 12-12-2014 at 01:21 PM.
One of 8 bosses... again.
Ah, true... I did not qualify that. The fit is more in line with the RT length rail. Function has nothing to do with the rails.
 Practice Target

Don't be confused by the man behind the curtain. . . . .
Nobody - There are more pics of this one available but as cougar20th said there are many subtle modifications to this one that no one has caught without me pointing them out. If interested I will elaborate in PM or you can search AO. The mods and pics are here somewhere.
EDIT: I rarely do ANYTHING common. . . . . .
......You know you want one!!
New Hampshire Indoor PB
If you dump the bottom rail and go for a straight screw attachment you can hide a tickler LPR inside the gripframe with some milling. What has to be done is:
1) Drill a hole in the ASA after the on-off and bottom of the frame to allow air to pass between the two.
2) using a mill drop a depression around the hole such that you can slip an o-ring in between your frame and your ASA to seal the air.
3) Thread the new hole in the grip frame
4) Profit.
I take no credit for the photo below, so one of y'all can speak up about it. I'm looking at you Cyberave68
Practice Target
You have way over simplified it. I can tell by your post you have never done this before. Maybe you should save the comments for people who have.
Now if you have questions then post away. Maybe you will get the right answer or maybe someone with limited knowledge will chime in and fill the thread with meaningless dribble.
I speak from experience not from "supposed" knowledge from looking at pictures!")
 www.BigEvilOnline.com


True.
I get a lot of work fixing builds from the internet experts.
RKM 3D Designs
yeah very true, ive built many pnumags over the years for people and for myself. that is not enough info to get someone to do this properly.
listen to Loguzzzzzz, he is the reason I havnt needed to send any pneumags to him.
he taught me to fish, instead of giving me a fish.
Registered User

There's loads of room in a email frame but you will need some milling done, the tricky bit is getting the pneumatics setup correctly, they take a bit of fine tuning but not overly difficult there's plenty of threads on here to see what needs doing and if in doubt just ask on here there are some really helpful people who I'm sure would be willing to advise you
 Posting Permissions

 Reply With Quote

