Results 1 to 20 of 20

Thread: (Fixed) Tried Rebuilding My X-Valve and Now the Gun Does Nothing...

  1. #1

    (Fixed) Tried Rebuilding My X-Valve and Now the Gun Does Nothing...

    Took the plunge and bought a used mag (x valve and ULT). After watching the videos and looking at the valve diagrams, I was feeling like Billy Bad Ass and tried to rebuild the gun's x valve using the official AGD x-valve parts kit. I've clearly done something wrong. Gas it up, pull the trigger...nothing happens. I could have sworn I followed the diagrams and put everything back together correctly but it is soo hard to tell the different o-rings, teflon washers, etc apart. Any idea what I did wrong?

    This is the image I've been working off of: http://www.pblegion.com/attachment.p...1&d=1222976503

    Any help determining which of the white rings are o-rings and which are hard flat teflon "washers" would help me double check my work.

    Thanks,

    cmaples
    Last edited by cmaples; 12-20-2014 at 02:41 PM.

  2. #2
    Join Date
    Sep 2008
    Location
    Sunny Florida- Woot!
    Posts
    5,240
    Not meaning to rub salt in your wounds but was the valve leaking? First basic rule of AutoMag ownership is "don't fix it til it's broke".

    If it was leaking, was it at least firing before? Could be a number of things. A picture of the marker make actually help as well. More information on set up. Sometimes it may not be the valve at all and may be that the sear rod isn't adjusted properly. Post up a pic of the valve aired up and in the marker.
    Last edited by OPBN; 12-19-2014 at 06:11 AM.

  3. #3
    Take out the on/off and oil it up really good inside and out. Oil the whole gun. this fixed my mag issues manny times. These things love oil.

  4. #4
    Join Date
    Nov 2012
    Location
    Finland
    Posts
    940
    Have you tried increasing the velocity? It won't cycle unless it has enough pressure.

  5. #5
    Cyco-Dude Guest
    Quote Originally Posted by cmaples View Post
    Any help determining which of the white rings are o-rings and which are hard flat teflon "washers" would help me double check my work.
    there are no teflon o-rings in a reactive valve. you are using, from front to back: a reg seat o-ring (lvl 10 carrier o-ring), a power tube o-ring (for the rt on/off bottom), a small rt on/off o-ring (goes inside the on/off bottom), a reg pin assembly o-ring inside of a power tube o-ring (seals the on/off pin with the valve body), two reg pin assembly o-rings for the regulator pin assembly, another reg seat o-ring, a fourth reg pin assembly o-ring (fits in the regulator body), reg body o-ring, reg piston o-ring. zero teflon o-rings, as none were included in the parts kit.

    there are two plastic washers in the valve. the larger one is used in the power tube (part 9), which goes in before you put the lvl 10 carrier into the power tube. there's also a small split plastic washer which goes on the valve pin assembly in-between the two o-rings there. it's not called out on the diagram you listed; it just notes the valve pin assembly itself (item 27).

  6. #6
    Join Date
    Mar 2007
    Location
    Was in FL. now LI N.Y.
    Posts
    655
    Quote Originally Posted by cmaples View Post

    Any help determining which of the white rings are o-rings and which are hard flat teflon "washers" would help me double check my work.

    Thanks,

    cmaples
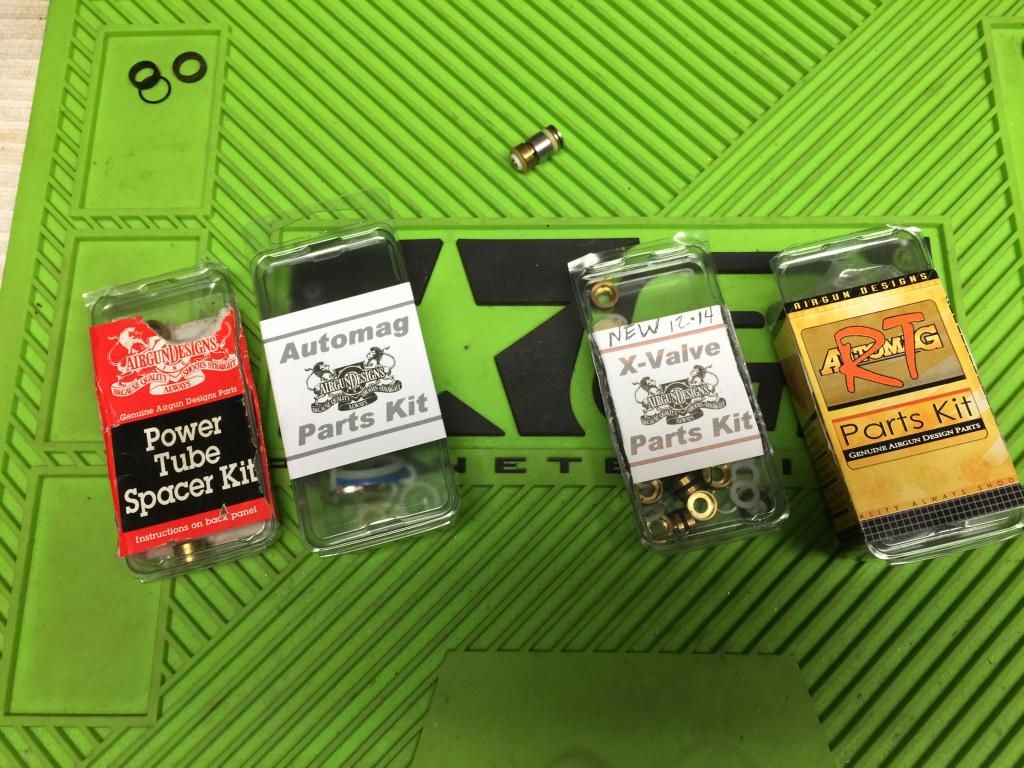
    Which kit did you use ? Have a feeling you may have used the kit over to the left labeled "Automag parts kit " That one is mostly for Classic valves.
    The new O rings (in the kit that you used)sometimes all appear to all be white ,if theres a Teflon oring in your rebuild ,that would be an issue rite there ,as White Teflon Orings only go to classic valve on/off's . Using the diagram you posted Check your on/off for a Teflon White o ring in place of #17 or #20 . Look @ pic below . Kits to the right are what you need ,for an entire X-valve Lvl10 rebuild.
    . If this is all good ,then i suspect " Bolt stick " . Your carrier for the Lvl 10 is too tight or backwards ,or added too many shims . Using the same Oring #7 (000844), keep trying different carriers ( brass in X-valve parts kit )till it works ,yet doesn't leak . I know this is tricky the first time around, but you'll get the feel of it soon enough . This is an important step for your future rebuilding knowledge
    Im assuming everything worked fine until you went to rebuild valve ?


  7. #7
    Nu_metal - Everything was pretty much fine until the rebuild. I bought the "X-valve" parts kit in the picture but it didn't come with any of those brass carriers. Is it supposed to have those in the kit? Might have gotten gyped. Here is a picture
    of the power tube parts in the order I had them installed and the on/off valve. The white ring to the left of the on/off valve is one of those "plastic washers" that I'm probably mistakenly calling teflon.
    Name:  20141219_085859.jpg
Views: 613
Size:  66.9 KB

    This all would be much easier to explain verbally. I'd be happy to PM my phone number to anyone who wouldn't mind spending 5-10 mins on the phone helping the N00b :-)

    I'll try to put together a bigger write up with pics when I get home. On a side note, are the o-rings pretty stiff when they are new? usually o-rings are soft, a little stretchy, and easily squeezed together such that the sides touch, but all of my white o-rings were very stiff and difficult to squeeze or stretch.

    thanks,

    cmaples

  8. #8
    Thanks Cyco-Dude. I should have said plastic washers. I'll take it all apart tonight and post some pictures of the parts in order.

  9. #9
    Join Date
    Oct 2001
    Location
    Inception Designs HQ
    Posts
    3,080
    Assuming that you uad repoaced everything the way it came off the valve, then check your sear rod length. That would prevent firing. Also, make sure that your on/off pin is the right way in. Make sure the "ball end" goes into the valve & the flat to the sear. After that, you are beyond my Xvalve knowledge.

    Paging the Mag Whisperer...

  10. #10
    Cyco-Dude Guest
    first of all, the x-valve rebuild kits do not come with any brass lvl 10 carriers.

    second of all, you have a ULT on/off. you probably need to add a shim or two. i bet you just didn't put them all back after you took it apart. just be careful that it's a ult shim and not a lvl 10 shim. they are the same size, but the ult shim is about half the thickness of a lvl 10 shim.
    Last edited by Cyco-Dude; 12-19-2014 at 09:01 PM.

  11. #11
    Cyco - Good call i had the wrong shims in it (still might actually as trying to tell the difference between 1 sheet of paper thickness and a 1/2 sheet of paper thickness is crazy hard)

    1) with the valve outside the gun I ran some low pressure air through it. While holding the On/Off top in the valve and turning the air on the On/Off pin popped out and pressure started to build up behind the bolt. So far so good.
    2) Setting the bolt spring aside, I put the bolt and valve back in the gun (without the bolt spring). Medium pressure air through the gun, airs up, no leaks. Pull the trigger, gun fires but bolt doesn't reset (because there is no bolt spring in it). Air leaks down the barrel (because the bolt didn't reset) but holding the trigger in stops the leak. This also seems like expected behavior and a good sign.
    3) put the bolt spring back in, gun is fully assembled. Add high pressure air, pull the trigger, gun won't fire.
    4) took the trigger frame off, put the bolts back in so now the body and valve are bolted to the rail. Now I can air everything up and look at the sear. High pressure air, the bolt doesn't look like it is moving forward to catch the sear. move the sear around, nothing happens. Is this describing bolt stick? I wonder if the front edge of the bolt is catching the lip in the body that the bolt spring rests on.

    Any ideas anyone?
    oh yeah when reassembling I cleaned all the old lube out and used Lucas Oil 10533 White Lithium Grease on the reg spring pack and Super Lube 51004 Synthetic Oil with PTFE, High Viscosity, on everything else.

    Thanks in advance,

    cmaples

  12. #12
    Join Date
    Nov 2012
    Location
    Finland
    Posts
    940
    What lvl 10 carrier are you using? Try going to the largest size carrier. Reason being, if you changed the power tube o-ring you'll need to retune you lvl-10.

    Oh and remove that shim from lvl-10 (if installed), you shouldn't ever need one.

  13. #13
    Cyco-Dude Guest
    Quote Originally Posted by Laku View Post
    What lvl 10 carrier are you using? Try going to the largest size carrier. Reason being, if you changed the power tube o-ring you'll need to retune you lvl-10.
    it could be that it's now too tight, but if he only has the one carrier, tuning is limited to just trying all of the lvl 10 / reg seat o-rings he has and finding the one that fits the best.

    cmaples, you can use lvl 10 shims in the ult, you just have to be mindful of it. umm...not firing with spring (lol?). tank pressure too low, tank output pressure too low (have you tried a different tank?), valve velocity too low, sear trigger rod length too short, not enough shims in ult, too much friction in lvl 10 carrier. dunno about "high viscosity" oil...might gum up the works if it's too thick.

  14. #14
    Join Date
    Jan 2002
    Location
    Halifax, N.S., Canada
    Posts
    8,039
    The X-valve parts kit does not come with carriers. They only come with the Level 10 bolt kit, or you can order them individually. If you don't have any, you should get a few from size 0 to 2.5. You won't need to buy the one(s) you already have.

    You shouldn't ever get bolt stick when you aren't using a bolt spring. There will always be enough force on the bolt stem because there is nothing pushing back. The fact that it worked without the bolt spring using low pressure air is a positive sign. Make sure the bolt is fully in the reset position, or the sear won't rotate forward to open the on-off pin. This holds true, even if there is no bolt spring. When you are testing, make sure you push the bolt back when it is aired up. You can push the bolt back with a squeegie or dowl through the front.

    Often when you install a new carrier and oring that is too tight, the bolt doesn't sit in the reset position due to the spring not having enough force to reset it. This is bolt stick. The same bolt stick will prevent the gun from firing even if it is in the reset position, because the air in the chamber does not have enough force to overcome both the spring force and the friction force of the oring on the bolt stem.
    Except for the Automag in front, its usually the man behind the equipment that counts.

  15. #15
    Join Date
    Mar 2007
    Location
    Was in FL. now LI N.Y.
    Posts
    655
    oh woops sorry i didnt notice i had put my extra carriers in the kit

    this is a cool reference site : http://www.airgundesignsusa.com/xmag/html/lvl10.html

    I'll try to put together a bigger write up with pics when I get home. On a side note, are the o-rings pretty stiff when they are new? usually o-rings are soft, a little stretchy, and easily squeezed together such that the sides touch, but all of my white o-rings were very stiff and difficult to squeeze or stretch.
    These o ring are made of a higher durometer . (90) i was told by AGD . Yes that means they are harder to squeeze with your figures and are usually yellowish / off white in color .Mags run with a higher pressure so these withstand it and last longer . The soft black rubber o rings would blow out ,cut and fail alot faster

  16. #16
    Cyco-Dude Guest
    Quote Originally Posted by NU_METAL View Post
    These o ring are made of a higher durometer . (90) i was told by AGD . Yes that means they are harder to squeeze with your figures and are usually yellowish / off white in color.
    the color is because they are made out of urethane, instead of buna-n (which is black).

    also, the thread says "fixed"...what turned out to be the issue?

  17. #17
    Join Date
    Aug 2006
    Location
    West By God Virginia
    Posts
    3,405
    [QUOTE=Cyco-Dude;

    also, the thread says "fixed"...what turned out to be the issue?[/QUOTE]


    That's what I was wondering

  18. #18
    Sorry! Guess I didn't hit post on my reply. Firstly, thanks to everyone for the help. I changed the power tube o-rings until I found the one with the least resistance, put the two shims in the power tube like the AGD site recommended and then cranked the pressure up all the way. Gun seems to be cycling fine and the initial issue that prompted the rebuild also seems to have cleared up. I'm shocked by how precise (finicky) these machines are. But I guess it makes sense considering how balanced the forces must need to be. Enough pressure to overcome the spring but able to reset on the slight resistance of a paintball. What a great learning experience. Won't know it's fixed for sure until I run some paint through and chrono it, but so far so good.

    Thanks again for all the help.

    Cheers!

    Cmaples

  19. #19
    Join Date
    Jan 2002
    Location
    Halifax, N.S., Canada
    Posts
    8,039
    Quote Originally Posted by cmaples View Post
    ...put the two shims in the power tube like the AGD site recommended and then cranked the pressure up all the way. ...
    Take the shims out. They won't make any difference to the operation, but they can cause leaks that will mistakenly cause you to install a carrier size that is too tight for your bolt stem. This can then lead to bolt stick issues.

    Here is an updated tuning guide for your level 10:

    Don't follow the AGD instructions exactly. We have found a few tweaks over the years that negate some of the original thoughts that are in the original instructions.

    The carriers are sized using lines and dots. Each line represents a 1 and a series of dots represents 0.5. Eg; 2 lines and dots equals size 2.5. Carriers range from size 0 to 3.5 but most people only have from 0 to 2.5 and most new kits have even less.

    When tuning your level 10, remove all the shims from the powertube before starting. They don't affect the operation but they can cause false leaks which cause you to use a carrier size that is too tight. Don't put them back when you are done. You shouldn't ever need them.

    For carrier sizing:

    Find the carrier size that causes the installed oring to fit freely over the bolt stem. The carrier should sit on the bolt stem without moving if the bolt is held in a vertical position. If you tap the valve on a hard surface, the carrier should be loose enough to allow the bolt to move. If you have to force the carrier onto the bolt stem with any force at all, then it is too tight. Install the bolt and valve into the gun. When aired up there should be no leaking. If it leaks, take the carrier out and replace it with the next smaller size. Always use the same white carrier oring in each carrier that you use. It is the orings that you are adjusting. Try it again. You want to use the largest carrier size that does not produce a leak.

    Any time that the gun fires and does not reset or short strokes and does not reset, or just chuffs and does not reset, the problem is most likely a carrier that is too tight. Installing shims will not help. Shims only help if the bolt moves, hits an object but does not vent any air, and then cannot reset because the chamber is still fully charged. Most of the time the bolt always moves far enough to expose the vent hole, get rid of excess air, and then reset.

    For spring adjustment:

    You want to use the bolt spring that allows you to shoot about 20fps above the lowest velocity that the gun will cycle at. So, if you want to use the gun at 280fps, then your desired lower limit of operation is 260fps. Insert your long bolt spring. Turn the velocity adjuster down before you air up the valve. Then gradually turn up the velocity until the gun will cycle. This is your lower velocity. Measure it. If it is above 265fps, then you will need a shorter spring or you will need to clip the one you have (unless you have red one. They are usually in the correct range). If you clip a spring, only clip half a coil at a time and then try it using the same procedure of starting with a low velocity setting. Make sure you put the cut end of the spring towards the bolt. If you have the short spring installed, and the lower range is 30fps below the desired shooting velocity, I wouldn't worry about using a stiffer spring and would just go with the short bolt spring. If it was much lower than that, I would definately clip a long spring to get closer to the desired range.

  20. #20
    Thanks athomas - i'll save this post for the next time I get to a chrono.

Posting Permissions

  • You may not post new threads
  • You may not post replies
  • You may not post attachments
  • You may not edit your posts
  •