
I'm interested in knowing where this ended up? I thought I remember people talking about mocking up a new printed parts so cutting is minimized.

 Registered User

I'm interested in knowing where this ended up? I thought I remember people talking about mocking up a new printed parts so cutting is minimized.
Registered User

with loguzzzzs new mounts, id be down for one of these, i have a spare rotor id cut up all day
 Justech.us
It looks like the warp tube needs to be fixed inside the lid to stay over top of the red paddle, since it turns. Is that the case?
Registered User
Ive tried hunting down the box rotor parts needed to make this great idea, but have been unsuccessful. Anyone have leads or access to dye parts?
I can't get due to respond to inquries
 Registered User
Did you by chance test to see if the hopper would feed the gun consistently with out modification?
I'm thinking hopper totally stock, no mods, mounted with the proper bracket and a feed tube to the gun.
I'm kinda scared to cut up my rotor, by at the same time I fear the effort required to use a q loader, the alternative.
Thanks,
Jim
yes, i could have purchased something new for the same money.
Registered User
This is what I am going to be trying to do. I haven't gotten everything set up to try it out yet though. I was going to order a higher torque motor and install it into the hopper and see if it will work.Originally Posted by tucson.az.jbreen

I would like to get the Box Rotor parts though, that seems like it would be a nice way to go.
 RKM 3D Designs

if someone gets me the top shell for the rotor,
i could try to cad one that doesnt have to be hacked up, i print it and you put it on your rotor, and boom warpless rotor.
 Registered User
I'm not in on this project but I'm also not needing my rotor for a couple of months. I don't care to send the top piece out for blueprinting if there is anyone that wants to cover shipping each way.
Registered User
I think I have the standard shell top as well that I'm not using. I have the extended capacity on my rotor currently, so the standard tip is in my spare parts bucket. Not sure if you need the lid and ext, but I can send the plan top without the lid. Since it's sitting I can send without worrying to much with time frame as long as I do get it back.
 Hebrews 13:8

He'd probably need the lid to make sure it fits ok on the new printed part.
RKM 3D Designs
i might be set but ill keep it in mind.
Registered User
I can send a complete lid/top, although I think you have it already covered. Let me know if this is of interest to you.
I'm excited to see this done, especially on the design end. I was thinking more about the feed port that will arise out of the lid and how it connects to the internal paddle (red piece) from box rotor. As previously mentioned, the paddles spin which make it a critical point since much is dependent on stack psi. I was invisioning a portion of the internal lid contains a sleeve oriented directly above the spinning paddles in the printed lid. This would allow flexibility in tolerances and allow the user to insert a cut 10rd tube to precise length without touching the paddles. Anyhow, I'm excited to see this come to life.
 Bearded Works


why not just 3d print the piece that holds the lid on and a diagram of here to the the existing shell to make it fit. instead of doing a whole new top.
RKM 3D Designs
because I can make a top that has no mods or cutting all the plumbing is articulated.
Registered User
I have my parts ready, let me know if you need some testing...wink wink
RKM 3D Designs
I have a few projects. But if you are in town it makes conversation easier
Sent from my SM-G930V using Tapatalk
Registered User
Unfortunately I'm not In town, maybe next year for a pheasant hunt. I do understand your busy with life and projects. I'll raise a glass in hopes of taking a couple of these off your hands in the near future.
RKM 3D Designs
I can travel, remind me in a pm where you are. I'll meet time
Sent from my SM-G930V using Tapatalk
Registered User
Fingers crossed while breathing life into this thread...........
RKM 3D Designs
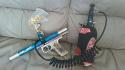
hey so how did you get the balls to feed up instead of down. ur pics confuse me some.
im not at home so I don't have my rotor in front of me.
Bearded Works
he is using the red and black pieces from a box mag. instead of pushing the paint down it pulls it up then he just made the tubing.
RKM 3D Designs
damn how do I get just those pieces
Registered User
I called dye and they sold me the parts. I ordered everything minus the battery pack in the second folder.

Last edited by barkingspider; 11-04-2017 at 07:23 PM.
Cheater Tac one
What did it run You?
Sent from my SM-G920W8 using Tapatalk
Registered User
I think it was around $36, but that was 8 months ago.....my memory isn’t so sharp these days
RKM 3D Designs
ill be ordering what i need then.
woop. this should be interesting.
Registered User
I can send you what I have if that is easier?
Registered User
Found my receipt from Dye, keep in mind I ordered two of each part

Last edited by barkingspider; 11-05-2017 at 11:25 AM.
RKM 3D Designs
perfect. thank you.
ill see what kinda bulk buy i can get done for those parts.
Justech.us
I ordered parts a couple years back too. Just got in my LT-R this weekend. You only need the red center-feed arm and the black cage that goes on top of it. You don't need any other parts. I ordered just those two things and, IIRC, I think it was something like $17 shipped to my house from DYE. You do have to call them directly though. No place online seems to sell those repair/replacement parts.
Those parts are literally drop-in mods to make the Rotor feed upwards, and I tested it with reballs for awhile this evening. As far as 3D printing the mods to the shell, you may be able to just print a "color change kit" if the necessary feed hole in the upper shell fits completely below the main piece in the color change kit. That way people could just drill a hole under their color kit and it would be completely covered if they wanted to go back to the standard setup. I'm not sure a 1" hole would fit completely under the color change kit at the correct spot though.
Last edited by Justus; 11-12-2017 at 08:55 PM.
 Posting Permissions

 Reply With Quote

