Results 1 to 27 of 27

Thread: Should it be called a MicroX?

  1. #1
    Join Date
    Feb 2008
    Location
    Boulder, Colorado
    Posts
    1,038

    Should it be called a MicroX?

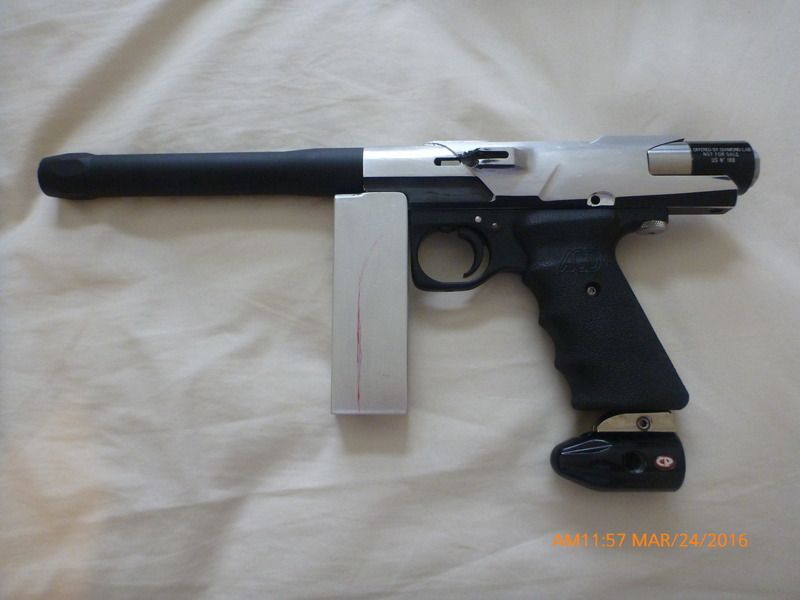
    When I first saw an X-mag, I fell in love, the lines, the flow, but I couldn't bring myself to purchasing one way back when, even now, if I bought one, I'd probably never take it to the field.
    So... I've always been thinking about how I might obtain something close. I've had many micromags, and I'd picture ways to modify the bodies to the form I'd want, but I could never bring myself to cutting up a perfectly good micro. Until now...
    I managed to obtain a black gen4 micro, in rather shoddy shape, it had pitting, damage, and had been spray-painted... even then, it took a lot of mulling over... I had the body for 2 years, and only now decided to go for it.


    For the most part, the shape of the body is as I'd want it, still need to clean up and polish it, and do some work on the fore grip to make it fit style'wise, and to turn it into a gas-thru.

    Thoughts? Yay? Nay? lol, I'd imagine many will be saddened by the fact that I cut into a micro.
    Last edited by BiNumber3; 04-05-2016 at 05:12 PM.

  2. #2
    Join Date
    Jun 2012
    Location
    SoCal
    Posts
    234
    Looks good to me!

  3. #3
    I see you're selling the pinstripe parts. So what's the anno plan for this marker?

  4. #4
    Join Date
    Feb 2008
    Location
    Boulder, Colorado
    Posts
    1,038
    Not too sure yet, I'm leaning towards a solid color, to keep the lines more visible.
    Will probably be using my Triton frame on it. My frame has ebony wood grips, so probably something that will fit with that.

    That and I'm pretty sure the aluminum for the fore grip is a different grade, are there colors that I'd want to lean toward that would be easier to match despite grade?

  5. #5
    Cyco-Dude Guest
    looks kinda cool...kind of like euro xmag-style milling.

  6. #6
    Join Date
    Feb 2008
    Location
    Boulder, Colorado
    Posts
    1,038
    So, was looking though Caustic Customs' pictures, and he had a DYE Reflex with a light golden anno for some of the parts, and it looked gorgeous....

    So if/when I have it anno'ed, I think I'm between the light golden color, or a dark bluish grey (blued steel or gunmetal?)

    Also, is it particularly difficult to remove the steel ring inside the body? Do most annodizers have the tooling to do that?

  7. #7
    I think this would look boss with a single-trigger frame and that fore grip shaped up a bit.

    I know that would take away some from the x-mag look, but think of the foregrip milled with a similar cutout to the read of the marker (sort of like the crab claw foregrip).

    And yes, the gold would be sweet. or do a radius fade from gold at the back/bottom to clear at the front/top.

  8. #8
    Join Date
    Feb 2008
    Location
    Boulder, Colorado
    Posts
    1,038
    Yea, I'm planning on doing a good amount of work on the foregrip, though I also need to drill and tap it for the air through. So making sure I don't screw that up lol. Will be testing the drilling and tapping on another piece.

  9. #9
    Join Date
    Oct 2004
    Location
    Mt. Pleasant, SC
    Posts
    2,743
    I haven't really ever been a fan of the micromag bodies, however this one looks pretty good.

  10. #10
    Join Date
    Feb 2008
    Location
    Boulder, Colorado
    Posts
    1,038
    Thanks, getting that Micro Barrel you sent me Freak Bored too

  11. #11
    Join Date
    May 2002
    Location
    Colorado
    Posts
    4,001
    Great minds think alike. Been sitting on a messed up micromag that I had Luke mill down for me. I always love clean edges and lines on guns.

    Here is what it was:


    Here it is after getting back from from Caustic Customs.


    Oh and Caustic had a tool to remove the steel ring from Micromags but between the 2 micromag bodies I sent him the tool broke so he just masked off around the ring. Turned out great because you get what you pay for with him. I'm very happy with how clean it came out.

    Yours is looking pretty sweet too.

  12. #12
    Join Date
    Feb 2008
    Location
    Boulder, Colorado
    Posts
    1,038
    Hmm, I'm loving it with the barrel, the triton doesn't quite fit though, might just have to use an intelli. Both are comfortable enough to me, though the Triton is a bit more comfy
    Last edited by BiNumber3; 04-05-2016 at 05:11 PM.

  13. #13
    Quote Originally Posted by BiNumber3 View Post
    Hmm, I'm loving it with the barrel, the triton doesn't quite fit though, might just have to use an intelli. Both are comfortable enough to me, though the Triton is a bit more comfy
    Just for me, throw a single-trigger on there and snap a pic. I have an image in my head, but don't know if reality would be anything close.

  14. #14
    Join Date
    Feb 2008
    Location
    Boulder, Colorado
    Posts
    1,038


    Like that? Only single frame I have. I like it, but doesn't quite fit the way I hold my gun

  15. #15
    Join Date
    Jun 2012
    Location
    SoCal
    Posts
    234
    Quote Originally Posted by BiNumber3 View Post
    Is that a DP raps asa?

  16. #16
    Join Date
    Feb 2008
    Location
    Boulder, Colorado
    Posts
    1,038
    No it's some unbranded lever ASA, they were sold on eBay a few years back, they work quite well, tho had to modify the pin depressor on em a bit, as they were too long for most tank pins. Quite solid tho, once the pin was fixed.

  17. #17
    Join Date
    Jun 2012
    Location
    SoCal
    Posts
    234
    Looks pretty similar. But very good looking with that drop

  18. #18
    Join Date
    Feb 2008
    Location
    Boulder, Colorado
    Posts
    1,038
    Yea, the lines fit surprisingly well, something I didn't notice initially at all when buying it in Hindsight, probably shoulda bought more (only bought 2), can't seem to find em anywhere anymore
  19. #19
    Quote Originally Posted by BiNumber3 View Post
    Like that? Only single frame I have. I like it, but doesn't quite fit the way I hold my gun
    Thanks. I really like the single-trigger look. A modified CCM 86* cocker frame would probably be really sweet, but spendy. (but it would also go to the end of the rail).

  20. #20
    Join Date
    Feb 2008
    Location
    Boulder, Colorado
    Posts
    1,038
    Yea, I've always liked the CCM single frames, but if I'm going to modify a frame to fit, I'd rather it be a $20 frame

  21. #21
    Join Date
    Feb 2008
    Location
    Boulder, Colorado
    Posts
    1,038
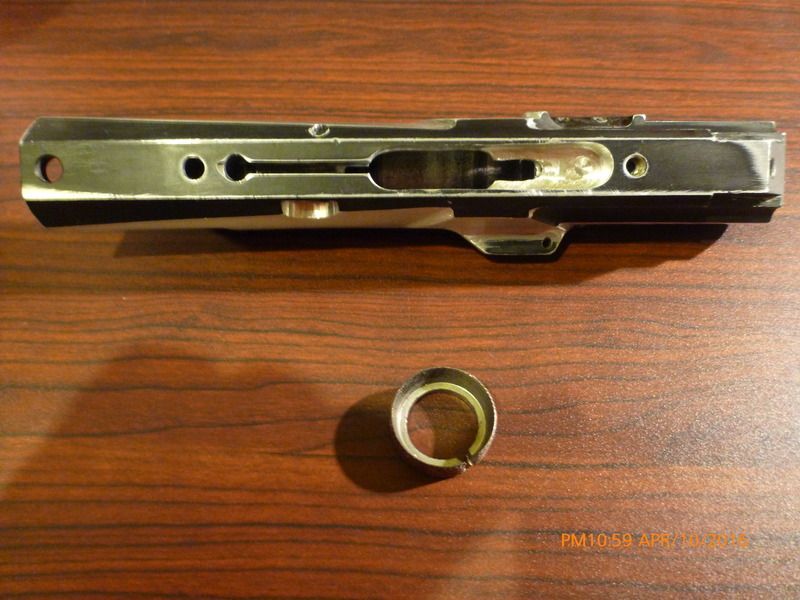
    Small update - Pretty much only 1 anodizer I've spoken to is even willing to try masking the ring, but even before finding him, I was thinking about other options.

    I'm thinking I can completely remove the ring, and have a new ring installed (from Luke or PTP, likely going with Luke's once he's finished designing it for his new gun). Attempted tapping it out from the powerfeed, you can just barely see the outer edge of the ring through the dovetail milling. It didn't budge at all, and I was afraid of putting too much force, so another option was needed lol.

    I decided to mill the bottom out abit, ULE milling pretty much, and from there, will drill out the steel ring from the bottom (basically drill small holes in the ring till it's cut). This idea came about mostly after I found I could probably get a rew ring if this one was destroyed (either from remove or from the anodizing). Will update on whether drilling it out is successful.


    Also, milled my intelliframe a bit, and screwed up... so cut off some material inside, no issues there, and cut off some material from the bottom, and there, I screwed up, for the better lol.
    I drew lines with a sharpie, but couldn't see them very well when dremeling. However, it looked fine during. After sanding and ensure it was level, I noticed something was off.

    Turns out I dremeled the material off at an angle. Approximately 5 degrees off 0 lol. At first I thought, oh crap... but then, realized it might not be so bad. You can kind of see the angle in the picture below.

    But here are some pics of the milling, and the current setup minus the foregrip:


    Oh, and I polished up the beat up X-Valve I had, seemed the best option aside from anodizing. Turns out the dings were a lot deeper than I thought, as though the previous owner tossed it in a tool box n shook it around.
    I didn't wanna sand too deep tho, to preserve the outer diameter as much as possible. Looks pretty, even with the dings. Polished the velocity nut too, looks like a rear-view mirror lol.

  22. #22
    Join Date
    Apr 2010
    Location
    Near Toronto, Canada
    Posts
    835
    Badass!!

  23. #23
    that looks really cool even without a foregrip. maybe even better because it doesn't have the foregrip.

  24. #24
    Join Date
    Jun 2012
    Location
    SoCal
    Posts
    234
    Can't wait to see how you mill the fg

  25. #25
    Join Date
    Feb 2008
    Location
    Boulder, Colorado
    Posts
    1,038
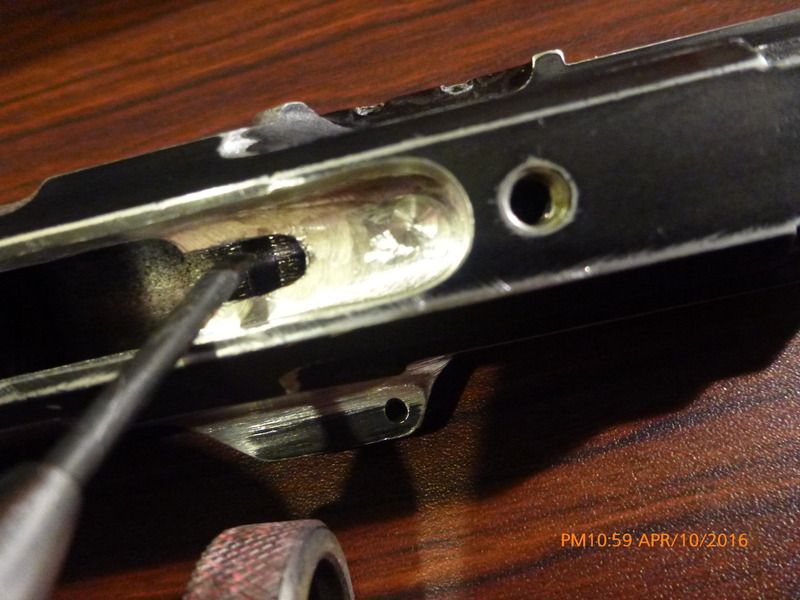
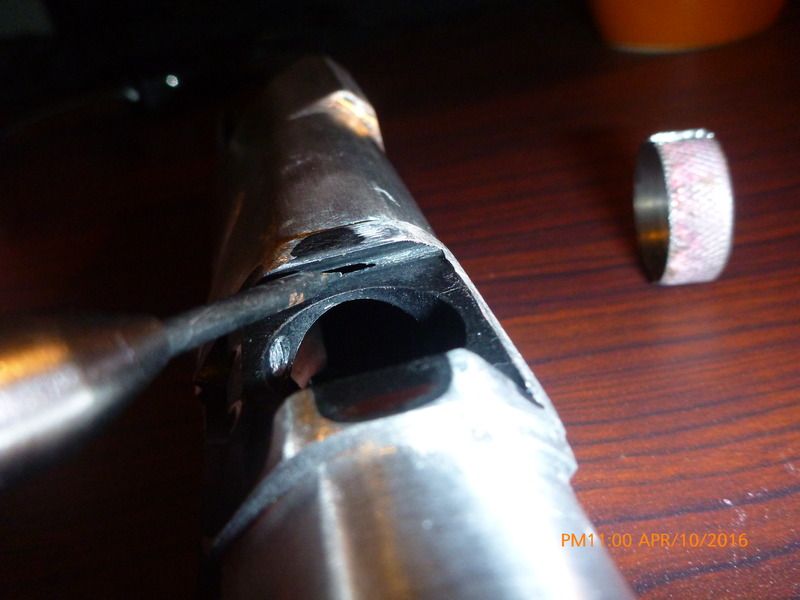
    Thanks guys, just waiting on the foregrip to get back to me (sent it out to get airlines and threads done), but here are some pics and details of the Spring Cup removal, for reference mostly, in case anyone else needs to/wants to.


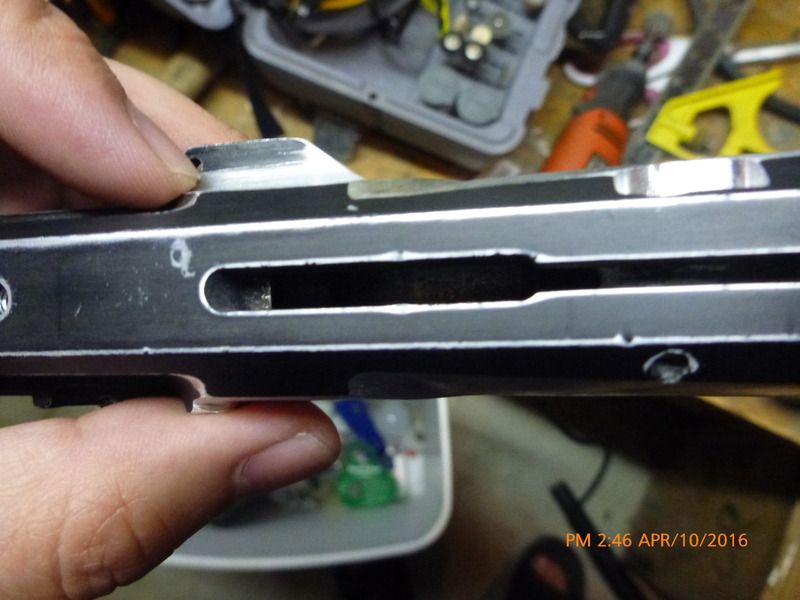
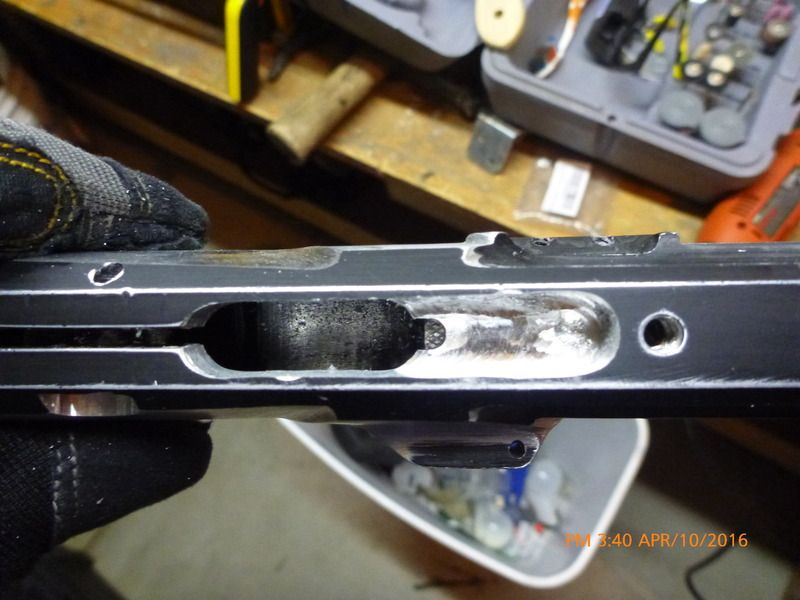
    I milled a small slot along the side of the spring cup, using a dremel and a small rotary burr. Milled it a bit wider than the burr itself, to give me space to work with after (Very important, as it'll be the only stable edge for tapping at the spring cup)

    Then cut the spring cup itself, using the same burr. Just have to be really careful to not go too far, making sure to stop just before the breech (probably wouldn't affect anything if you do go past, but if you can avoid it, might as well)

    With the cut in the spring cup, it becomes much easier to tap the spring cup around with a small screw driver and hammer. I started by tapping the 2 edges around where I cut, to loose things up.


    Below, is a picture of the dovetail where the powerfeed attaches, and where I'm pointing is a thin slit in the corner, where the spring cup is visible (should be visible on all micros). Using that slit and a small screw driver, I tapped it a few times there as well to loosen it up, not too much though.

    Side-note here: I think this may be the reason some ano projects fail, easy to overlook this spot when masking.


    Once you loosen it up and move it a bit, the diameter of the body opens up and it slips right out.


    Not sure if there would've been an easier way to do this, with less milling done to the body, but even PTP told me it was unlikely they'd be able to get the ring out, and it'd be easier to find someone to mask it.
    Last edited by BiNumber3; 04-11-2016 at 02:03 PM.

  26. #26
    Join Date
    Apr 2010
    Location
    Near Toronto, Canada
    Posts
    835
    Man that's sweet!

  27. #27
    Should call it, ExMicro.

Posting Permissions

  • You may not post new threads
  • You may not post replies
  • You may not post attachments
  • You may not edit your posts
  •