Results 1 to 9 of 9

Thread: Making a ULT work in a classic automag

  1. #1
    Join Date
    Oct 2006
    Location
    Houston, TX
    Posts
    3,555

    Making a ULT work in a classic automag

    We go to all sorts of trouble for pneumags. I decided to put some effort into making a ULT work in a classic. This bit is putting a magnet into the ULT pin base to get it to stick to the sear, which it does well. I got a couple of extra ULT pins from Tuna for these experiments, which was good since one escaped into the wilds of the garage pretty quickly.

    For this setup, I went with a classic frame so that I could play with stops, springs and magnets to trim up the trigger pull. I made it to the field this weekend for a couple of hours, forgetting every tool. I had set it up in the back yard, and it threw out 450 rounds without a trigger problem. I had one fat ball that the level 10 took about a dozen tries to choke down during a game (didn't have my squeegee either).

    On ULT breathe-ability, I drilled the top to 0.120". This maintains support of the centerline of the top o-ring plus 0.010" additional crush surface, while opening the area between the sides and the pin by a factor of four. I used a needle file to horizontally widen and taper the side ports. Shooting easy strings of 4 bps or 5 bps shots, I wasn't seeing any shootdown. I'm thinking with an electronic frame, it should be able to pull 8 bps at least.

    For now, I have a plain looking hopper-right power-feed classic automag, with a level 10 and a ULT.

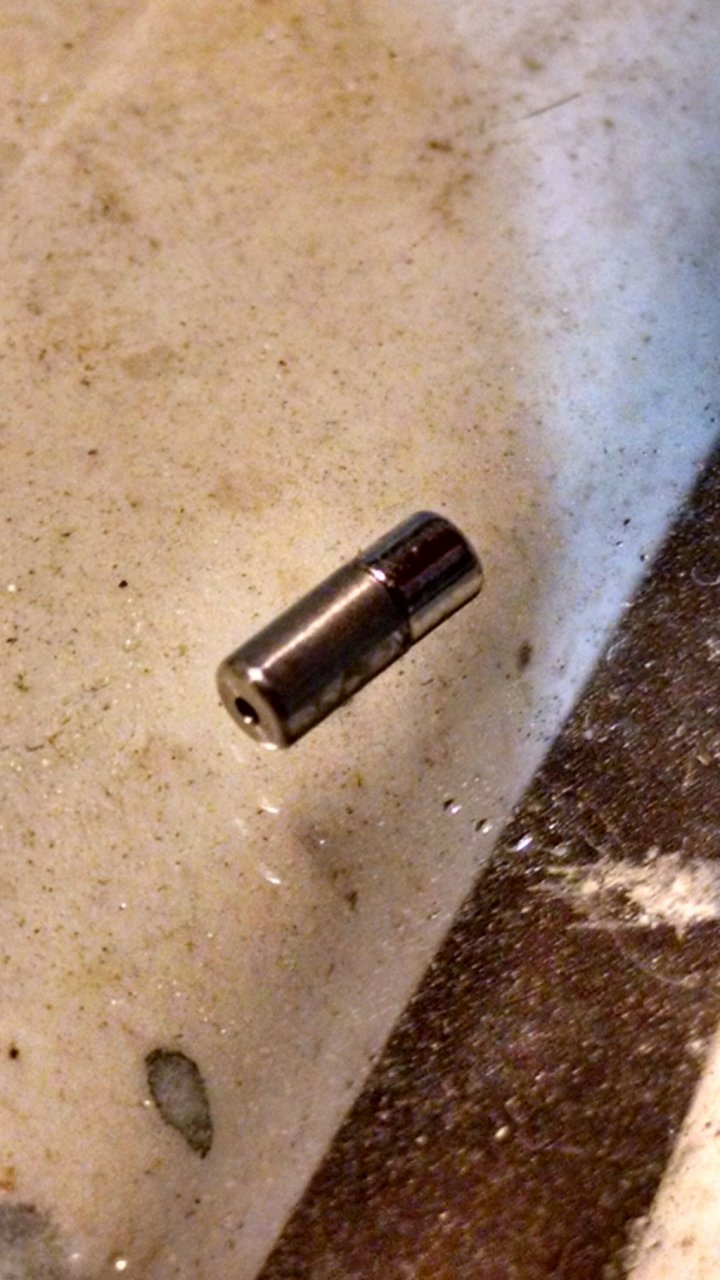
    The first attempt was a little difficult to assemble and keep aligned. This is a 1/8" diameter by 1/8" long magnet.


    The second attempt slid itself together. The ULT stainless is mildly magnetic. This is a 1/10" diameter by 1/10" long magnet.


    Added a trigger over-travel stop;


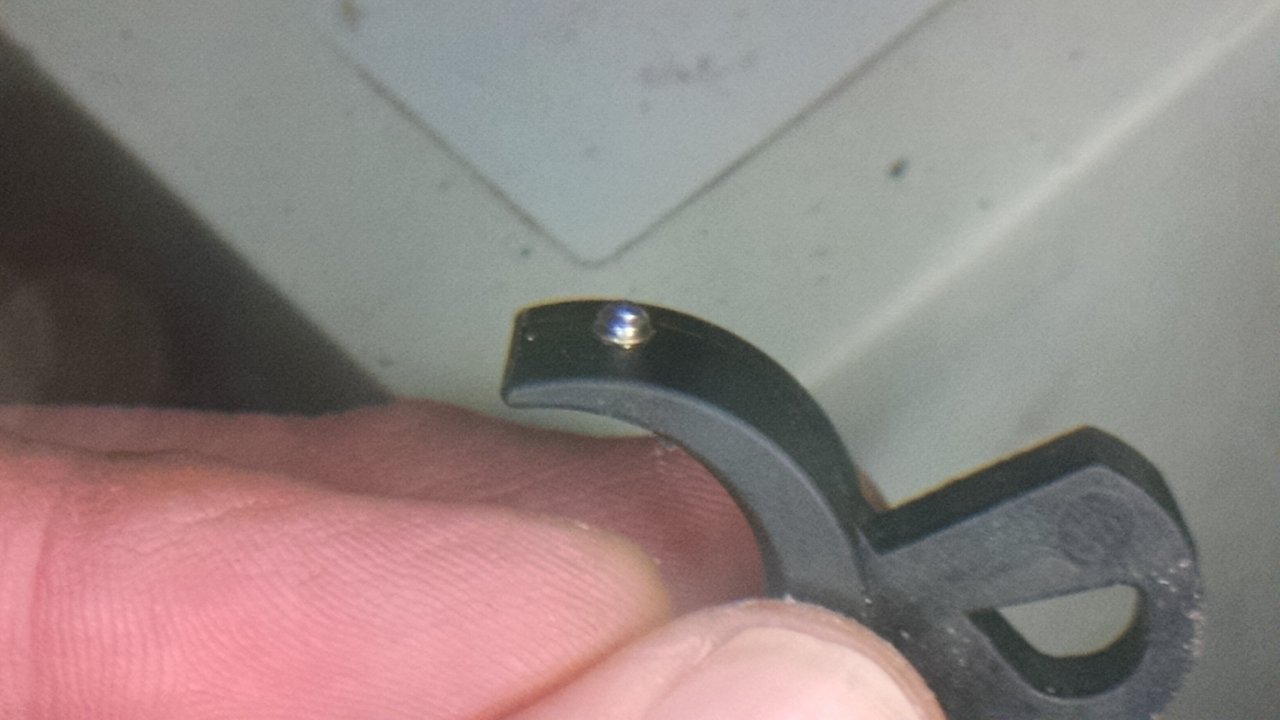
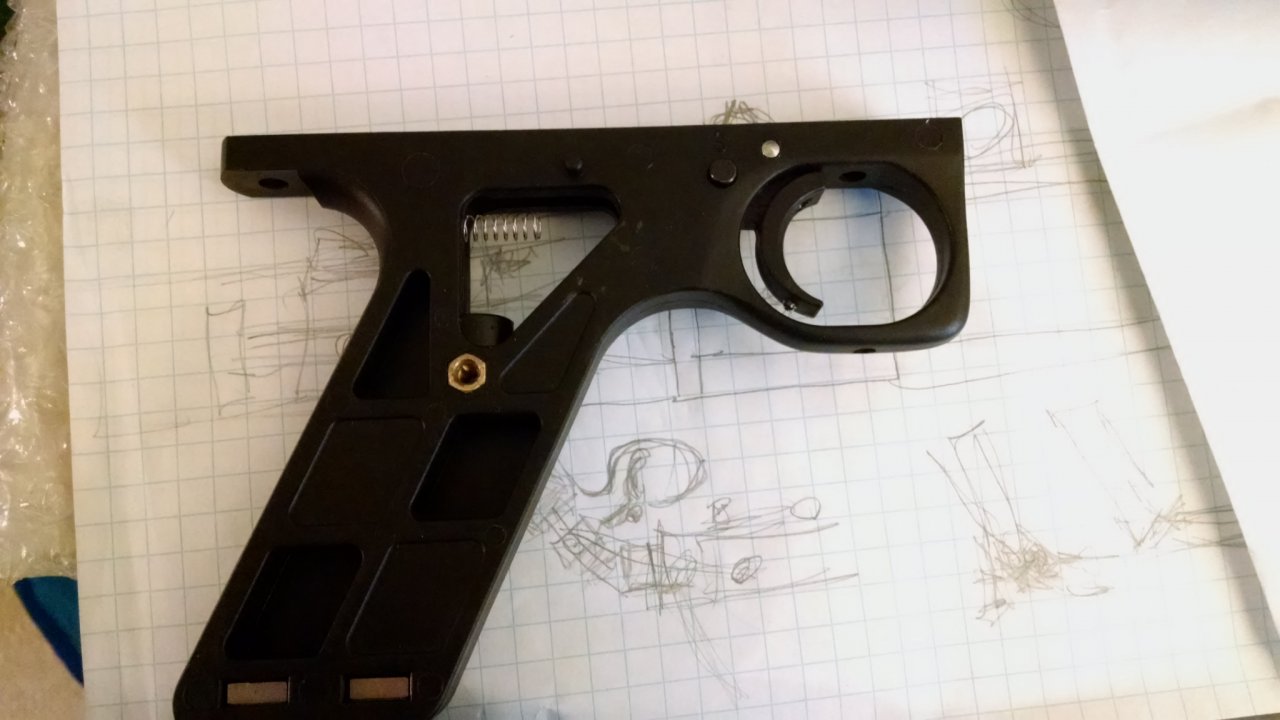
    Added a magnet in the trigger to give it a little breaking feel. It is almost too small, it is 1/16" diameter by 1/8" long (iirc). That is epoxy showing.


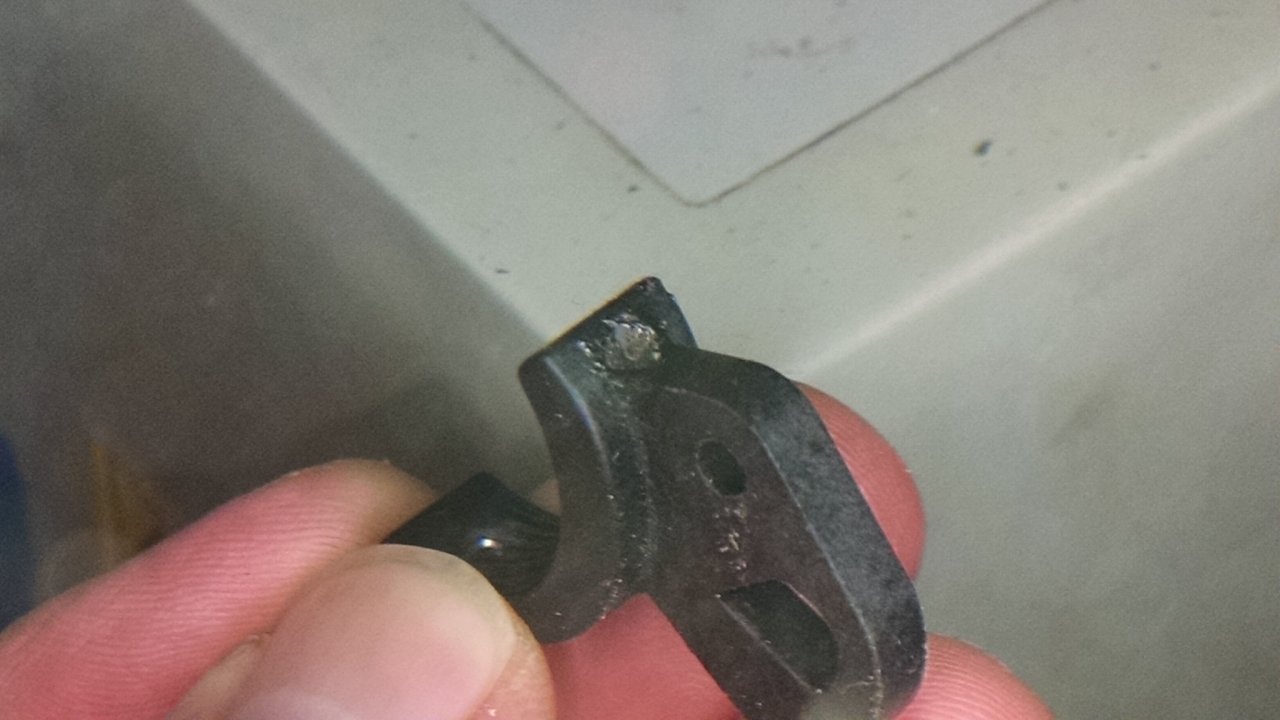
    and a set screw target in the frame for the magnet. Top,


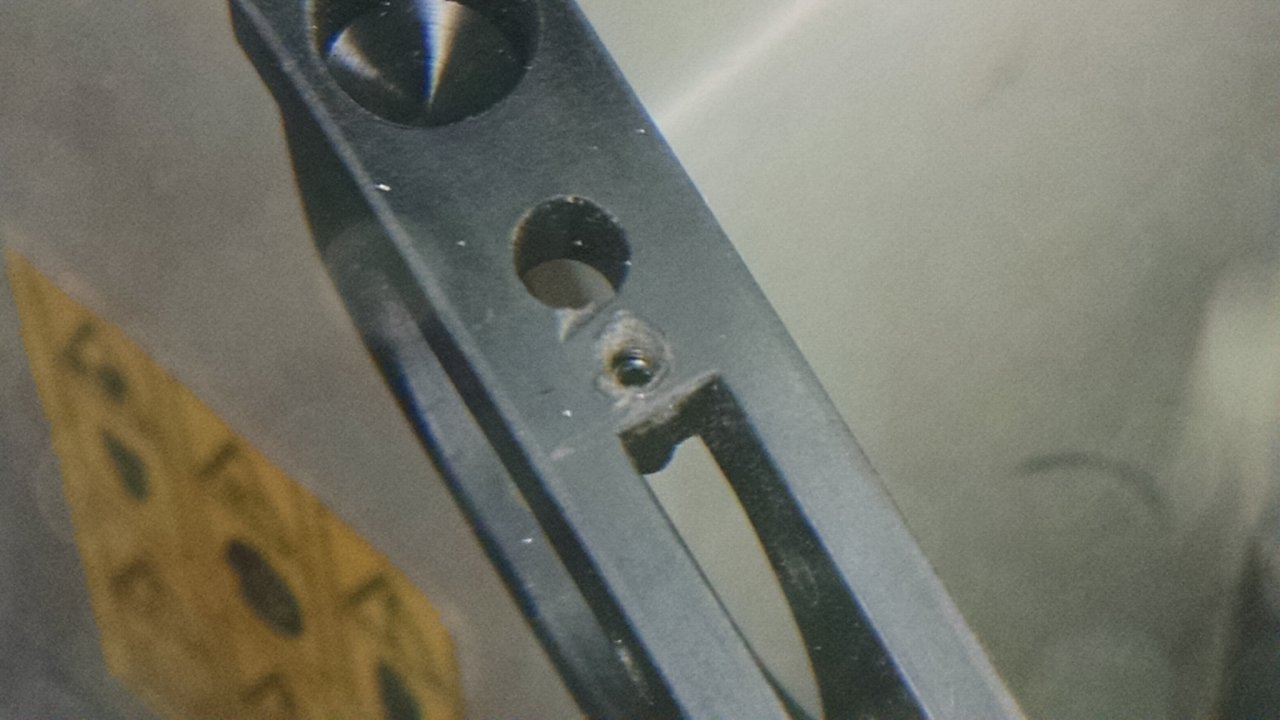
    and bottom view. The target ended up getting adjusted as close as possible to the magnet. It has a "break", but it is very light.


    added a return spring for the sear. This spring got trimmed by at least half. It is in a hole I dremeled into the very convenient pocket in the back of the frame, to keep it steady.


    I'll have to see how the magnet wears. I polished the sear face under the pin and put a layer of grease on it. It doesn't have a huge grip compared to the nickel plating of the magnet, so I have hope on wear.

    I have another setup with a 1/4" long spring with a 1/8" of unsprung space inside the ULT (no magnets). This works fine as far as the ULT goes. However, getting the valve out requires lifting the body off as the ULT pin ends up poking into every recess along the way. I will probably find a way to get it over the ULE rail pockets, but the first time was a PITA. The magnetic pin doesn't bother with the stainless and aluminum parts, so it comes out fairly normal except you have to push the trigger rod back.
    Last edited by Spider-TW; 03-19-2017 at 09:20 PM.

  2. #2
    Join Date
    Feb 2007
    Location
    Fredericksburg, VA
    Posts
    1,465
    Very cool. Now I'm wishing I hadn't sold all my extra ULTs.

    You mentioned this was for a classic pneumag. Any reason you decided on this particular solution instead of just increasing the pressure feeding the piston? Or lengthening the sear arm? Those seem to be much easier.

  3. #3
    Join Date
    Oct 2006
    Location
    Houston, TX
    Posts
    3,555
    Quote Originally Posted by rawbutter View Post
    Very cool. Now I'm wishing I hadn't sold all my extra ULTs.

    You mentioned this was for a classic pneumag. Any reason you decided on this particular solution instead of just increasing the pressure feeding the piston? Or lengthening the sear arm? Those seem to be much easier.
    Actually, the ultimate goal is to put the classic valve in a reliable range for a small pancake solenoid (e-frame). The ULT doesn't always like to open fully, even when the sear moves down. Reactive valves don't care too much. Springing and pulling the pin down forces it to open up, more like the other on/offs. Looking at the previous pancake designs and looking at the numbers, you need some headroom on the force of the solenoid and on/off to keep it reliable. This should help.

    Also, the extra work on the trigger came out pretty nice. I'll enjoy playing rec ball with it until an e-frame comes along.

  4. #4
    Join Date
    Feb 2005
    Location
    Texas
    Posts
    9,307
    You can get a very similar to ULT trigger pull by using an RT on off with a .740 pin. That will also work with the hyperframe style set ups. Problem with the ULT is that is will have trouble resetting the pancake noid. It sometimes does in the Xvalves too. The original Centerflag on/offs used a .740 pin very similar to the AGD RT ones.

  5. #5
    Join Date
    Dec 2004
    Location
    Jeet yet ?
    Posts
    8,139
    Pushing the boundaries, interesting.

  6. #6
    Join Date
    Oct 2006
    Location
    Houston, TX
    Posts
    3,555
    Quote Originally Posted by BigEvil View Post
    Problem with the ULT is that is will have trouble resetting the pancake noid.
    That's another reason why I lean toward the magnetic (spring assisted) arrangement over a simple spring loaded ULT. As long as the pin follows the sear, you can tweak the return tension down to the ounce and shift those mechanical loads around. I think the main limitation right now is how fast the valve can recharge through the ULT top o-ring. E-frames really help the effective bps by ensuring good recharge time. I'll wait for an Le90 frame to see where it tops out.

    We have a big game coming up next month. I'm hoping to give it a better manual rof test. Hopper ball with the renters didn't let me lean on it much.

    The other nice thing about magnets is that they are easy to keep track of. I bought 5 little springs for about $10, and I only know the location of the one that I installed. They roll and bounce like fleas. I need to find a receipt so that I can keep track of what I ordered.

    If I can't fit an assist spring into the Le90, I'll go to the spring loaded ULT (plan B).
    Last edited by Spider-TW; 03-21-2017 at 08:31 AM.

  7. #7
    Good stuff.

    What size and threads is the trigger stop you used?

    I've thought a long while about doing this in my classic frames, but could never get comfortable with how to do it both cleanly and ruggedly.

    Yours looks nice.

  8. #8
    Join Date
    Oct 2006
    Location
    Houston, TX
    Posts
    3,555
    Quote Originally Posted by Menace_AO View Post
    Good stuff.

    What size and threads is the trigger stop you used?

    I've thought a long while about doing this in my classic frames, but could never get comfortable with how to do it both cleanly and ruggedly.

    Yours looks nice.
    Thanks, I have to say it looks like a #4 (40)... I try to stay at #6 (32) or larger. I batted both around at the time, but I found that nice stainless set screw among my spares and settled it that way. It's not a high load, and it's easy to tap, so #4 or #6 will work. Set it where the trigger trips reliably before you put any additional pressure on the trigger (without taking up hinge slack), and you won't notice it is there (except when you go to take the valve out). If you just take one pass with the tap, the CF stays pretty grippy on the screw, and the screw stays in place well.

    I think it only stops about 0.04" of travel, but that is unused recovery travel on the on/off pin which can go to recharge time instead. If there is time in it, there must be money. Tuning ULTs with 0.005" shims and then stuffing the on/off pin through the o-ring an extra 0.030" to 0.050" seems like a waste to me.

    The other way to do it is to shorten (turn in) the trigger rod, which is not very convenient to adjust. Then you could use a pre-travel adjustment screw to get back to the "credit card gap", or just live with the dangle. The ULT pull by itself just feels like seal and sear friction. Without the RT bump, you don't get much of a cue to tell your finger to go the other way. A little break at the start and a bump in the back made it easy for me to pick up on the trigger action.
    Last edited by Spider-TW; 03-23-2017 at 12:52 PM. Reason: 4-40, not 4-32 idk that I have a 4-32 tap

  9. #9
    Join Date
    Feb 2005
    Location
    Texas
    Posts
    9,307
    Neat stuff going on here..

Posting Permissions

  • You may not post new threads
  • You may not post replies
  • You may not post attachments
  • You may not edit your posts
  •